


Marty1
Well-Known Member
- Joined
- Feb 3, 2009
- Messages
- 4,008
- Reaction score
- 236
Why go through all that when you can just buy finished wooden arrows :?:
Building your own wooden arrows for traditional bows allows you to create both a signature look to your arrow, as well as a complement to your particular style. Unlike uniform man-made shaft materials, shafts of wood demand individual attention when selecting for proper spine and straightness. Regardless of how much passion and effort(hunting for your turkey quills to burn, gathering your own sinew and shaft materials from nature, making your own broadheads from steel or flint, etc.) you may put into manufacturing each arrow component, taking game with a shaft of wood you designed and assembled yourself will surely be especially satisfying. I am no master arrow builder by any stretch of the imagination… as I’ve seen wooden arrows by others that are simply way-too pretty to scuff-up. Here I thought I’d just touch upon how little of equipment/materials are actually needed for start-up in making fully-functional, wooden arrows of hunting ability. Aside from purchasing the raw wooden shafts (I don’t whittle my own) and preferred arrow dressings (feathers, nocks, paint, etc.), all you need to get started are a Tapering Tool
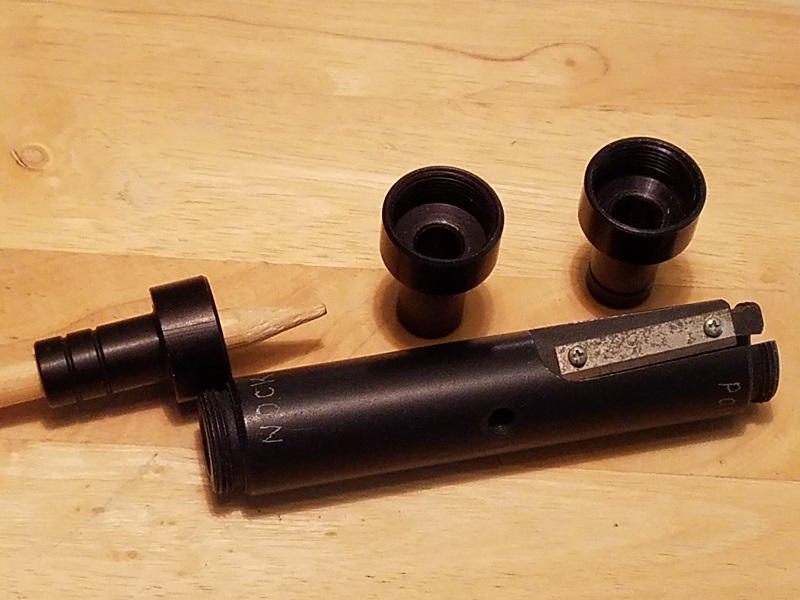
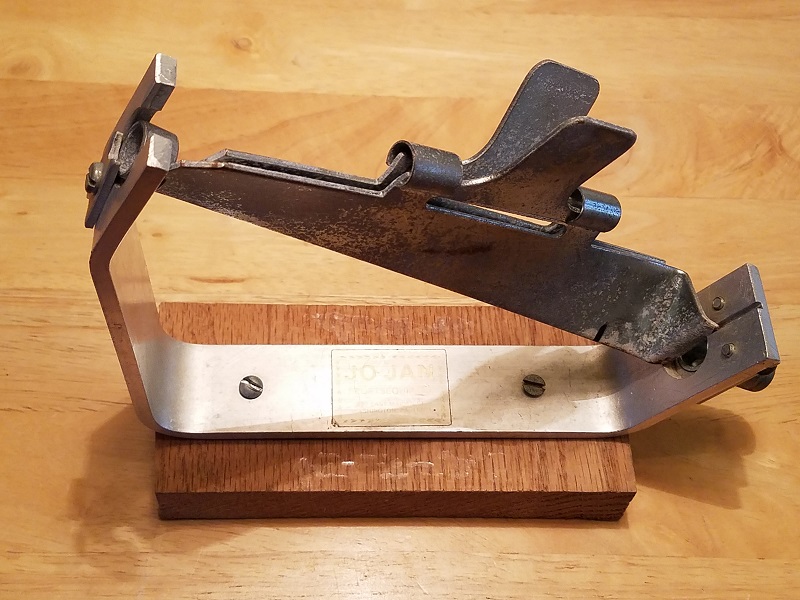
for the Nock End and one for the Point End, a Fletching Jig for feathers,
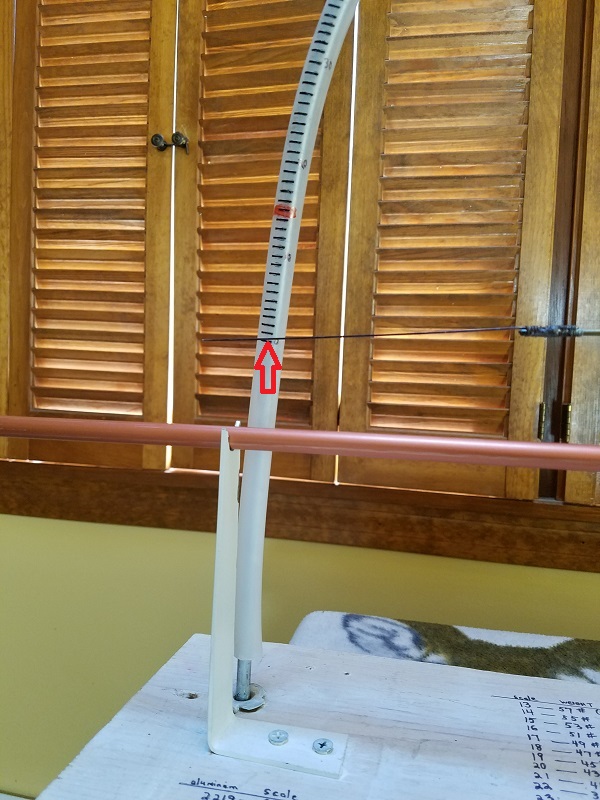
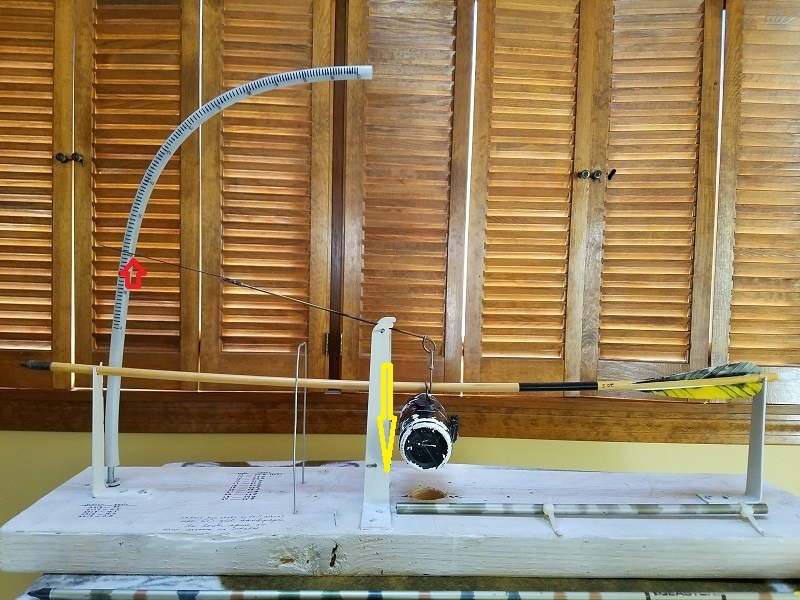
and an Arrow Spine Tester. The Spine Tester can be the most expensive item to purchase depending on how sophisticated it is… or how deep your wallet can be. Alternatively, you can make your own Spine Tester
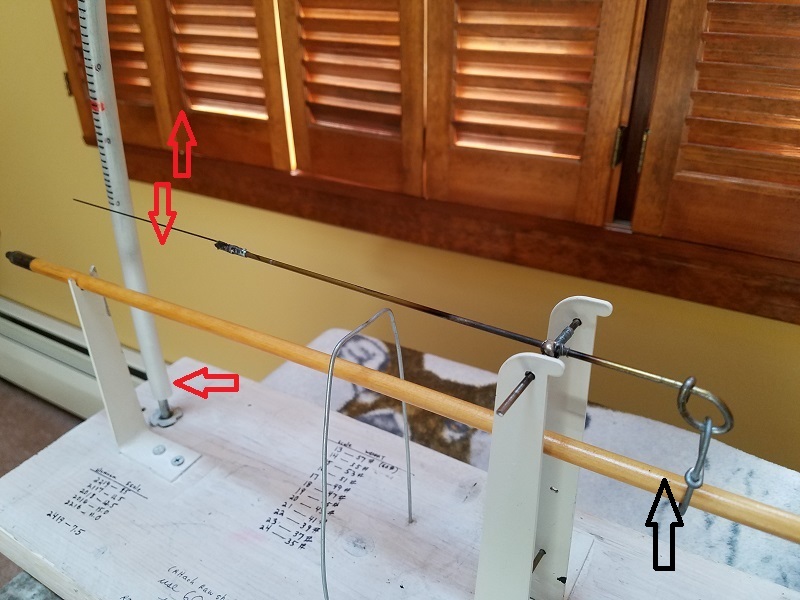
(Black arrow is where weight is placed).
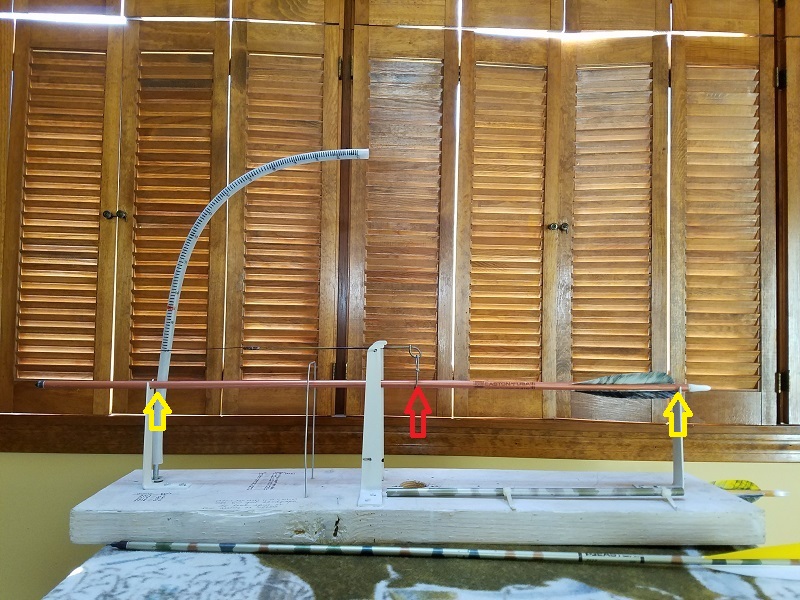
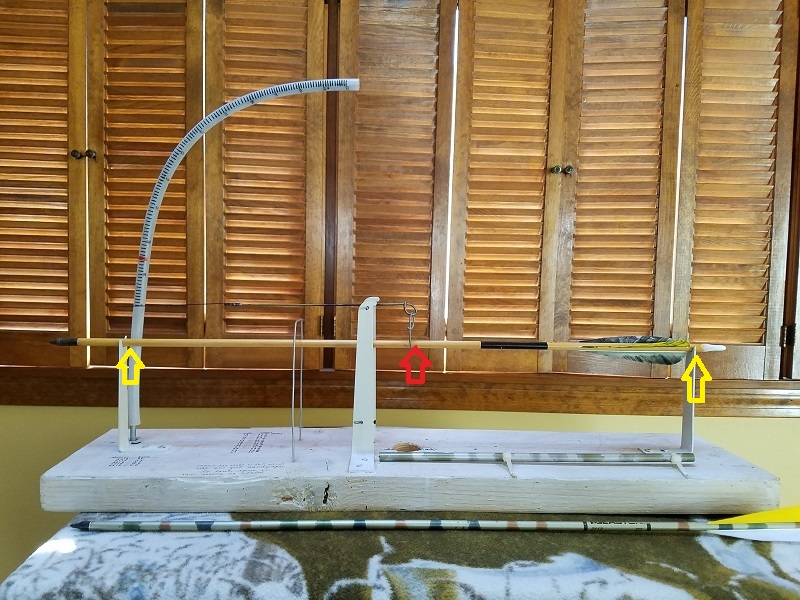
like frugal me (which actually turned-out to be a fun and satisfying project in itself) and many others have done if you understand the basic design principles behind it. I’ll start with a typical Spine (stiffness) Tester for wooden arrows. In general, a measurable degree of shaft deflection results from suspending a 2 pound weight in the center (red arrow) of a 26” span (yellow arrows) for a bare wooden shaft. That deflection is then compared to other shafts in terms of stiffness.
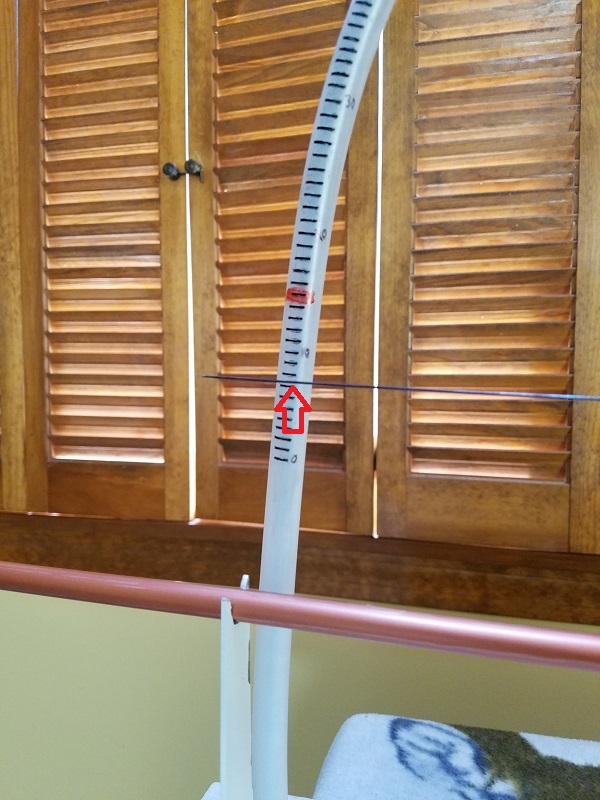
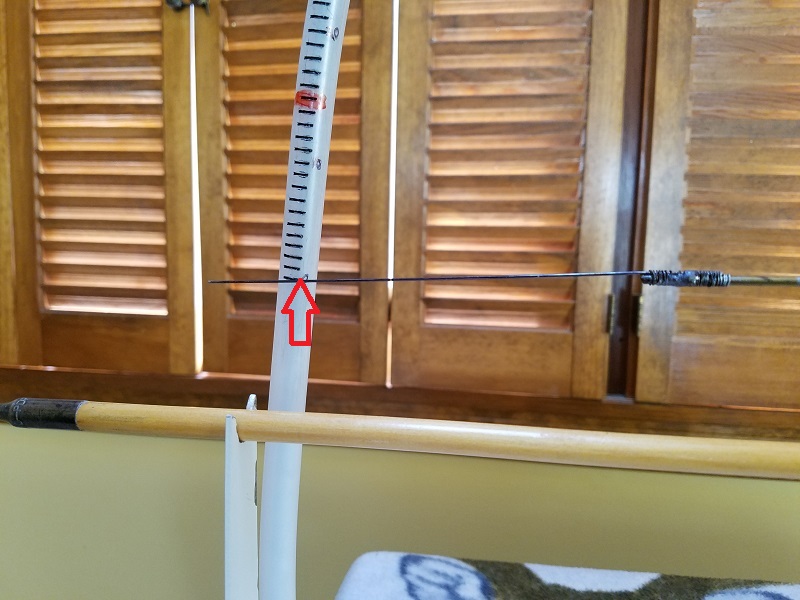
You can find several designs on the internet to make a simple yet accurate Spine Tester. My particular Tester followed basic design concepts. I calibrated the arched incremental scale on my Tester by performing spine tests on several aluminum arrows of different stiffness (1816’s, 2016’s, 2115’s, 2018’s, 2117’s, etc.) that typically fly well in traditional bows,
(zeroed)
(readout after adding 2 lb. weight)
and noted the numerical degree of deflection on the scale. I then used these numbers as standard references in determining the relative spine of any wooden arrow shaft.
(zeroed)
(2 lb. weight added)
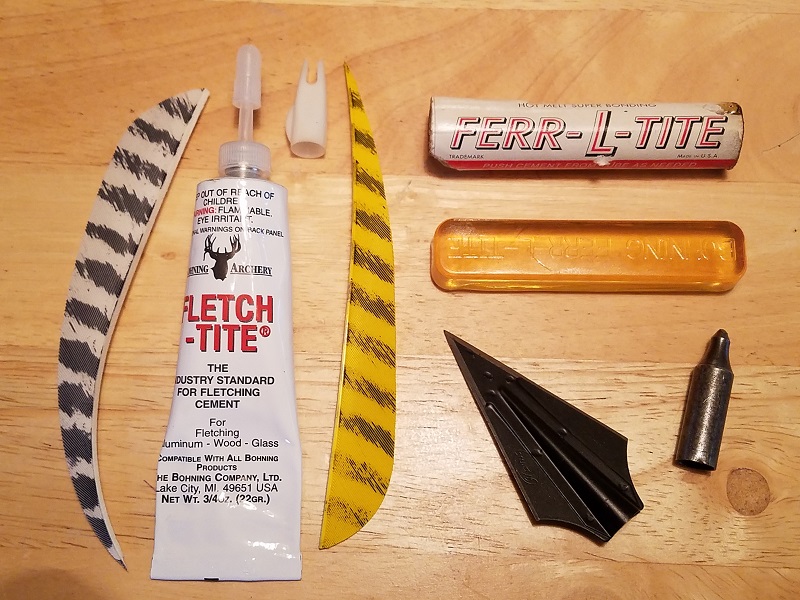
Other essential arrow making components include Fletching/nock Glue and tip Cement.
That’s basically it in a nutshell for starters.
So if you’re still shooting aluminum arrows out of your traditional bow and looking for a related hobby, or ready to stack-on yet another elemental challenge to your bowhunting, give wooden arrow building a try. Good luck, and…
“May all your wooden arrows fly straight and true”.")
Building your own wooden arrows for traditional bows allows you to create both a signature look to your arrow, as well as a complement to your particular style. Unlike uniform man-made shaft materials, shafts of wood demand individual attention when selecting for proper spine and straightness. Regardless of how much passion and effort(hunting for your turkey quills to burn, gathering your own sinew and shaft materials from nature, making your own broadheads from steel or flint, etc.) you may put into manufacturing each arrow component, taking game with a shaft of wood you designed and assembled yourself will surely be especially satisfying. I am no master arrow builder by any stretch of the imagination… as I’ve seen wooden arrows by others that are simply way-too pretty to scuff-up. Here I thought I’d just touch upon how little of equipment/materials are actually needed for start-up in making fully-functional, wooden arrows of hunting ability. Aside from purchasing the raw wooden shafts (I don’t whittle my own) and preferred arrow dressings (feathers, nocks, paint, etc.), all you need to get started are a Tapering Tool
for the Nock End and one for the Point End, a Fletching Jig for feathers,
and an Arrow Spine Tester. The Spine Tester can be the most expensive item to purchase depending on how sophisticated it is… or how deep your wallet can be. Alternatively, you can make your own Spine Tester
(Black arrow is where weight is placed).
like frugal me (which actually turned-out to be a fun and satisfying project in itself) and many others have done if you understand the basic design principles behind it. I’ll start with a typical Spine (stiffness) Tester for wooden arrows. In general, a measurable degree of shaft deflection results from suspending a 2 pound weight in the center (red arrow) of a 26” span (yellow arrows) for a bare wooden shaft. That deflection is then compared to other shafts in terms of stiffness.
You can find several designs on the internet to make a simple yet accurate Spine Tester. My particular Tester followed basic design concepts. I calibrated the arched incremental scale on my Tester by performing spine tests on several aluminum arrows of different stiffness (1816’s, 2016’s, 2115’s, 2018’s, 2117’s, etc.) that typically fly well in traditional bows,
(zeroed)
(readout after adding 2 lb. weight)
and noted the numerical degree of deflection on the scale. I then used these numbers as standard references in determining the relative spine of any wooden arrow shaft.
(zeroed)
(2 lb. weight added)
Other essential arrow making components include Fletching/nock Glue and tip Cement.
That’s basically it in a nutshell for starters.
So if you’re still shooting aluminum arrows out of your traditional bow and looking for a related hobby, or ready to stack-on yet another elemental challenge to your bowhunting, give wooden arrow building a try. Good luck, and…
“May all your wooden arrows fly straight and true”.
Last edited:
