


2nd post for me...
Ruger Old Army Modifications -- Making a Great Gun Even Better
Here's a listing of some of the modifications that I've done to my 'ol girl...
Hope you all enjoy it!
Old No7
Let's start off with the first mod I did, a modified front sight:
Gosh, it's got to be about 25 years ago that I hand cut & filed one each of those for my Dad's and my own Old Army's, as the undercut partridge-style sights were better (for us) for target shooting. Plus, we didn't plan to be doing any "fast draw" with them anyhow! My Dad is gone now (10 years), but my twin still has his old Old Army -- and we'll have to make a point to get them out this summer and make some smoke.
Since every decent front sight deserves a decent rear, my Dad and I both added Millet rear sights (easily available way back then...) to our Old Army's:
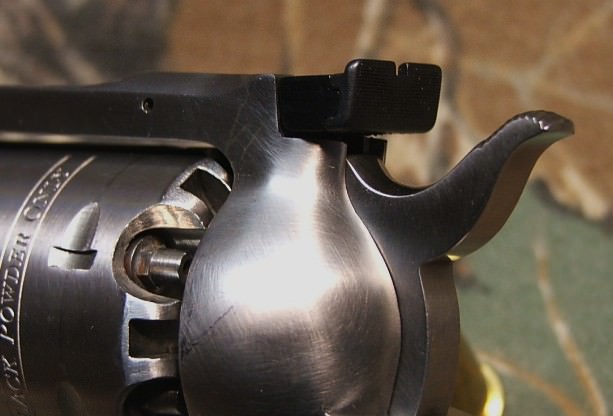
Some might question what this sight offered versus the stock Ruger model, and the basic answer is the WIDE and FLAT rear blade, which is the entire width of the sight. To us, that sight blade was much more consistent in all lighting conditions; whereas the stock Ruger blade was inset into the sight body, and you could sometimes pick up some glare off the sight blade or base itself.
One note... While we bought Millet sights intended for the Ruger Blackhawk series, if I remember right, we had to do some minor and very careful* filing to fit those correctly. (* As my late Dad would say, "Just go slow and check the fit often, as the metal-take-off tool works MUCH better than the put-back-on tools...")
This mod of a smooth trigger face is entirely personal; some may want it, others may not. My Dad kept his ROA trigger as stock, but I didn't like the feel of the grooves on the trigger, so I filed them out.
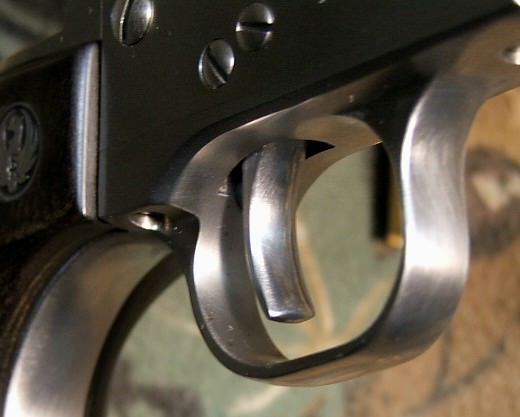
I know I'll never have to shoot the Old Army "double action", but I do like the way the trigger feels with this change done.
Before we proceed, let's add a necessary disclaimer:
You are on your own and assume any and all risks or liabilities for messing up your Old Army (or anything else!) if you work on your gun's trigger without knowledge and/or guidance. This writer assumes no responsibility for anything you do; this is offered for entertainment purposes only, not as a how-to guide. (Whew, now that we've got that out of the way...)
I'll admit I got some expert help on these trigger mod's, but it well worth it and greatly improved the trigger feel and pull on my Old Army.
The small red rectangle imposed on the pix below represents a "trigger stop", which is a small piece of aluminum inserted in the rear of the trigger pin (I forget the exact name of that Ruger part). This piece was perfectly fit by trial & error (multiple times), and was recommended by a friend who used to shoot his Old Army in the NMLRA Territorial Matches in Maine. He walked me through the process, and with his help and a good set of gunsmith screwdrivers -- and a whole bunch of assembly/disassembly steps -- the trigger stops dead just after she releases (as it used to move for another 1/8" of travel or more).
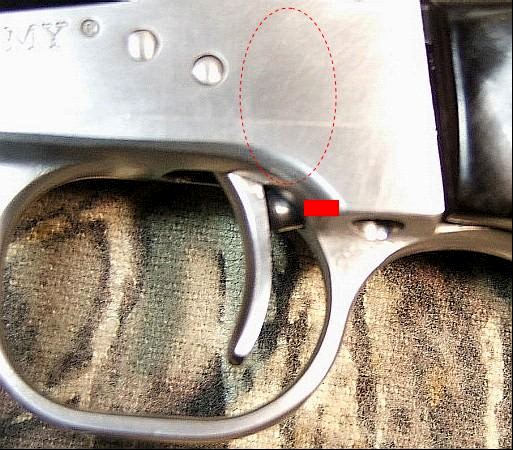
The dashed red circle indicates careful polishing work to the trigger's internals... I won't say any more other than the trigger now releases very cleanly and crisply at 2.75#, using the stock springs.
Those two mod's were the best changes I'd ever made to my Old Army and are the ones most responsible for the great shooting she can do -- when I do my part well, that is.
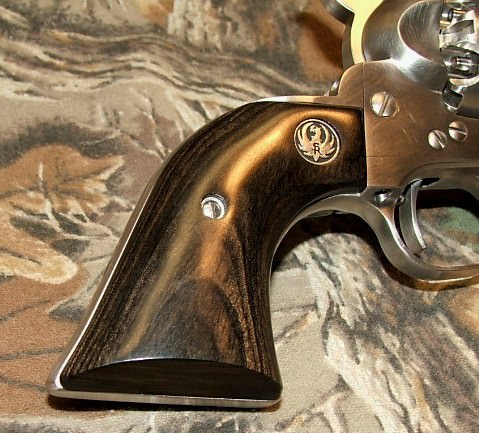
After all those prior mod's were done, I finished her off in style with a set of Silver/Black laminate grips custom made by Lett's -- they used to be the custom grip maker for Ruger, but I believe they are long out of business now. I really like the way the silver/black contrasts with the stainless finish.
I never did get a photo taken of the custom brass-tipped rammer that I had made up a few years back; but it added ~3/8" to the length of the existing rammer and works great for seating target loads (20 gr of powder with corn meal filler on top).
I also also added Treso Ampco bronze nipples and never have any cap jams when using those. In addition, I've highly polished the recess in the cylinder around each nipple, as that prevents any fouling from sticking and it's amazing how easily the fouling just rubs off, as there's no fine lines for it to "cling" to. (No pictures needed for these changes).
To finish this off...
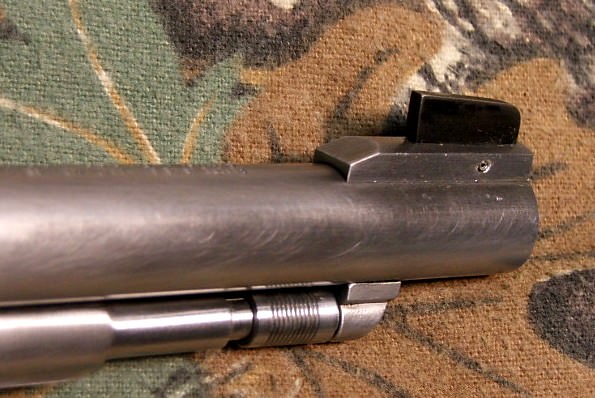
Here's the work I did to clean up the forcing cone, which was really roughly done from the factory. As you can see, there were some circular grooves in the original cone...
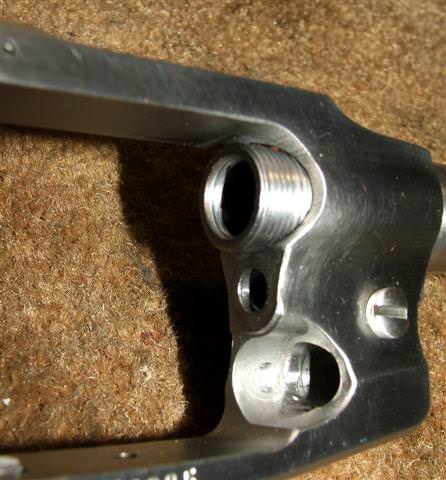
And here's how she looked after being carefully cut with a Brownell's 11-degree forcing cone cutter, and then polished with an 11-degree brass lap and 360-grit compound:

That's it folks. Tight groups to all!
Old No7
Ruger Old Army Modifications -- Making a Great Gun Even Better
Here's a listing of some of the modifications that I've done to my 'ol girl...
Hope you all enjoy it!
Old No7
Let's start off with the first mod I did, a modified front sight:
Gosh, it's got to be about 25 years ago that I hand cut & filed one each of those for my Dad's and my own Old Army's, as the undercut partridge-style sights were better (for us) for target shooting. Plus, we didn't plan to be doing any "fast draw" with them anyhow! My Dad is gone now (10 years), but my twin still has his old Old Army -- and we'll have to make a point to get them out this summer and make some smoke.
Since every decent front sight deserves a decent rear, my Dad and I both added Millet rear sights (easily available way back then...) to our Old Army's:
Some might question what this sight offered versus the stock Ruger model, and the basic answer is the WIDE and FLAT rear blade, which is the entire width of the sight. To us, that sight blade was much more consistent in all lighting conditions; whereas the stock Ruger blade was inset into the sight body, and you could sometimes pick up some glare off the sight blade or base itself.
One note... While we bought Millet sights intended for the Ruger Blackhawk series, if I remember right, we had to do some minor and very careful* filing to fit those correctly. (* As my late Dad would say, "Just go slow and check the fit often, as the metal-take-off tool works MUCH better than the put-back-on tools...")
This mod of a smooth trigger face is entirely personal; some may want it, others may not. My Dad kept his ROA trigger as stock, but I didn't like the feel of the grooves on the trigger, so I filed them out.
I know I'll never have to shoot the Old Army "double action", but I do like the way the trigger feels with this change done.
Before we proceed, let's add a necessary disclaimer:
You are on your own and assume any and all risks or liabilities for messing up your Old Army (or anything else!) if you work on your gun's trigger without knowledge and/or guidance. This writer assumes no responsibility for anything you do; this is offered for entertainment purposes only, not as a how-to guide. (Whew, now that we've got that out of the way...)
I'll admit I got some expert help on these trigger mod's, but it well worth it and greatly improved the trigger feel and pull on my Old Army.
The small red rectangle imposed on the pix below represents a "trigger stop", which is a small piece of aluminum inserted in the rear of the trigger pin (I forget the exact name of that Ruger part). This piece was perfectly fit by trial & error (multiple times), and was recommended by a friend who used to shoot his Old Army in the NMLRA Territorial Matches in Maine. He walked me through the process, and with his help and a good set of gunsmith screwdrivers -- and a whole bunch of assembly/disassembly steps -- the trigger stops dead just after she releases (as it used to move for another 1/8" of travel or more).
The dashed red circle indicates careful polishing work to the trigger's internals... I won't say any more other than the trigger now releases very cleanly and crisply at 2.75#, using the stock springs.
Those two mod's were the best changes I'd ever made to my Old Army and are the ones most responsible for the great shooting she can do -- when I do my part well, that is.
After all those prior mod's were done, I finished her off in style with a set of Silver/Black laminate grips custom made by Lett's -- they used to be the custom grip maker for Ruger, but I believe they are long out of business now. I really like the way the silver/black contrasts with the stainless finish.
I never did get a photo taken of the custom brass-tipped rammer that I had made up a few years back; but it added ~3/8" to the length of the existing rammer and works great for seating target loads (20 gr of powder with corn meal filler on top).
I also also added Treso Ampco bronze nipples and never have any cap jams when using those. In addition, I've highly polished the recess in the cylinder around each nipple, as that prevents any fouling from sticking and it's amazing how easily the fouling just rubs off, as there's no fine lines for it to "cling" to. (No pictures needed for these changes).
To finish this off...
Here's the work I did to clean up the forcing cone, which was really roughly done from the factory. As you can see, there were some circular grooves in the original cone...
And here's how she looked after being carefully cut with a Brownell's 11-degree forcing cone cutter, and then polished with an 11-degree brass lap and 360-grit compound:
That's it folks. Tight groups to all!
Old No7
